RCSails DIY Sailwinch
Sailing Monos
Sailing Multis
- Ninja
- FireDragon
- WRTM40 R2
- Nightmare X
- Triton II
- Inferno
- Nightmare MK VIII
- Venom
- Venom R
- Wavedancer
- Triton
Powerboats
Tips & Tricks
About us
Links
Follow @twitter
Courtesy of Francis Roussel (FFMN 9635)
franc.roussel@wanadoo.fr
Translated from the French language with the generous help of Bill Young, USA
How to build a Sail Winch from a popular MG995 compatible Servo
The Poor Man's RMG Winch
DIY Sail Winch
franc.roussel@wanadoo.fr
Translated from the French language with the generous help of Bill Young, USA
How to build a Sail Winch from a popular MG995 compatible Servo
The Poor Man's RMG Winch
Here are four most popular commercial sail winches used in boat classes between 90 cm and 1.50 m length: - RMG sail winch from Australia - Powerful, fast, the most famous - Regatta sail winch from Graupner, Germany - Sail Winch SW-2 from Robbe, Germany - High torque and 180 degree servos, servos from 1/5 scale cars or servos for quarter scale airplanes There are some less powerful, slower winches often used in smaller sailboats: - Hitec HS-785HB - The GWS S125 1, 3 turns and 6 turn sail winches There are new, interesting sail winches from Hong Kong: - Hobby King 10 kgcm sail winch, or Hobby King 13 kgcm sail winch cheap like standard servo but powerful and waterproof. Or, you can build your own drum winch as follows. You can find a Tower Pro MG995 compatible servo and many other R/C parts here. The MG995 compatible servo is very cheap and stocked by many merchants around the globe. - MG995 servo - multi-turn potentiometer ( like Bourns 3751H-1-502 5 kOhms) - Screwdriver - soldering iron - thin plywood, epoxy or carbon plate - metal file - shrink tubing - Two gears of the same pitch or same size teeth. (This is necessary so that your winch will turn freely. To test this try to get the gears set up so that they will engage each other and they are on axles that are fixed in place. You could do this if the axles are the same diameter and are placed in a vice. If the two gears turn freely without binding you have a winner.) We have designed a kit including the two gears with an integrated drum and a base plate which fits the MG995 servo to save you a lot of work, the kit can be ordered from RCSails Web Shop
The sail sheeting system needs a certain pulling force and a certain length of travel.The torque is given by the servo power and the length of the servo arm.(The longer the servo arm, the greater the travel, but the less the torque). The idea behind a drum winch servo is to rotate the servo for several turns to increase total travel with higher torque. For the MG995 this means: Torque 15 kgcm at 6v with 0.78 s for a 360 ° rotation. For a drum of 2 cm radius torque is 7.5 kg - but the travel is very little for 90° and not very useful. If the same servo turns 4 turns torque is the same 7.5 kg the travel with a drum of 2cm radius is 50cm in just over 3 seconds. |


|

|
| The MG995 Servo | The Multi Turn Potentiometer |
|
Open Servo (4 screws underneath), unsnap the top cover and locate the steel pin that prevents full rotation of the servo. With a good plier you can pull the pin out. Replace the cover over the gears. |
|

|
|
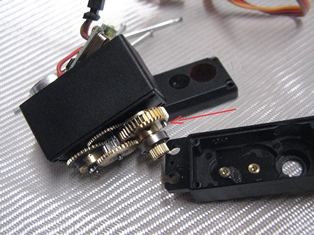
Identify the three wires that go to the servo's potentiometer, remove the screw that holds the potentiometer in place, and remove it. |

|

|
|
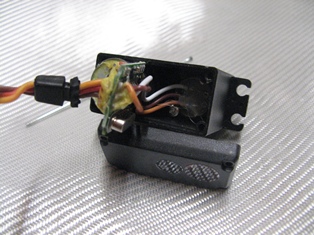
Unsolder the potentiometer after marking the middle wire, extend the wires and isolate with heat shrink tubing. (You can also unsolder the wires and replace with longer wires if you don't fear to unsolder from the PCB (Printed Circuit Board)). Drill a hole in the servo body, slide the wires through, and reassemble the servo. |
|
|
A Hitec servo is more delicate because the PCB is directly soldered to the motor terminals and potentiometer. You need to desolder the potentiometer and then resolder the new wires ... Delicate but not impossible with a good clean iron and desoldering braid. |

|
|
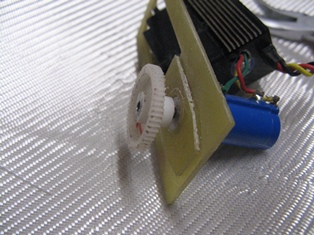
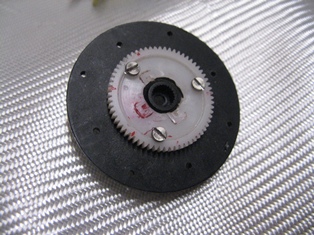
Get two gears roughly the same size, the one on the picture comes from a inkjet printer, but you can use any gears that fit. Cut a rectangular hole to accomodate the servo into the epoxy plate, then drill a hole with about 12mm diameter for the potentiometer shaft in the place that works for your gears. Drill a hole of about 9.5 mm (depends on the potentiometer you use) in a second smaller epoxy plate as shown in the picture. If your gear's bore does not fit the potentiometer shaft you need to make an adapter. It does not need to be a precision thingy, there is not much force on the gear. Attach the potentiometer to the small plate through the 12mm hole of the large plate and glue the gear in place. |
|
|
|
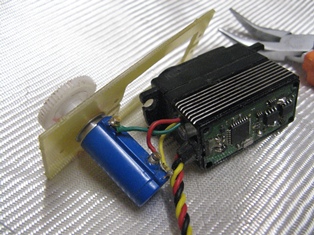
The other gear's bore is drilled open to a size that allows it to slide on the lower bushing of the servo disc. The servo disc is secured to the gear with two or three bolts through both parts. Attach the subassembly with the original screws. |
|
|
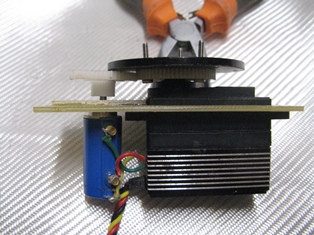
With the large epoxy plate secured in place adjust the gears. Check that the gears are in contact, if not adjust the hole in the large plate with a round file. Adjust the gears for a tiny play by moving the potentiometer on with the small plate, then glue the small plate in place on the large plate. Now solder the wires from the servo to the external potentiometer. The middle potentiometer wire goes to the bottom terminal, the other wires to the two leftover terminals. Without the servo's gear installed plug the servo into the receiver and switch on power. Turn the potentiometer by hand if the servo rotates inverted, simply change the two outer wires. Recheck, attach the servo disc and insulate the hole where the wire run through and the potentiometer terminals with silicone. You only need to find a drum to attach and your winch is ready. Basically you get 3 turns, but you can increase the turns by soldering additional resistors of around 2.2kOhms (1/4 Watt) inline with the two outer potentiometer wires. |
|